What Is a Total Solar Eclipse?
Total solar eclipses occur when the New Moon comes between the Sun and Earth and casts the darkest part of its shadow, the umbra, on Earth. A full solar eclipse, known as totality, is almost as dark as night.
The Science of Total Solar Eclipses
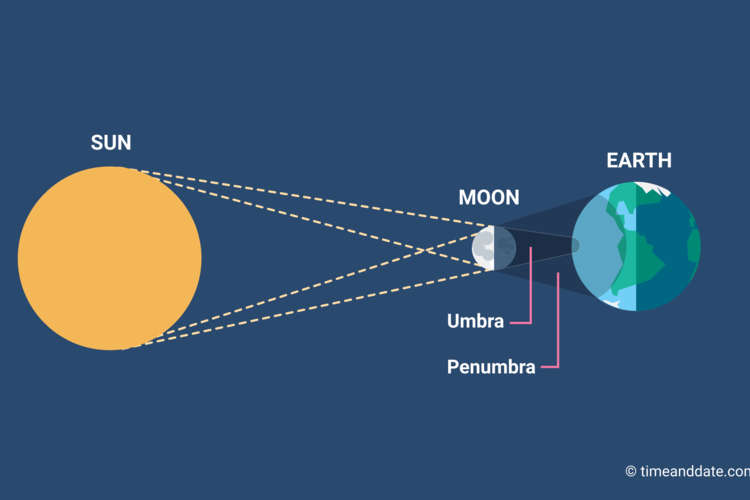
Only those located in the path of the Moon’s full shadow, its umbra, can see a total solar eclipse. The Moon’s umbra travels eastward at about 1,700 km/h (1,056 mph).
A total solar eclipse can last for several hours. Totality can range from a few seconds to 7.5 minutes. The longest total solar eclipse of the 21st century took place on July 22, 2009 when the totality lasted 6 minutes and 39 seconds.
Total solar eclipses typically happen a little less than once a year when:
- There is a New Moon.
- The Moon is near a lunar node.
- Earth, the Moon, and the Sun are aligned in a straight line.
- The Moon is near perigee.
Complete Solar Eclipse Has 5 Phases
There are 5 stages in a total solar eclipse:
- Partial eclipse begins (1st contact): The Moon starts becoming visible over the Sun’s disk. The Sun looks as if a bite has been taken from it.
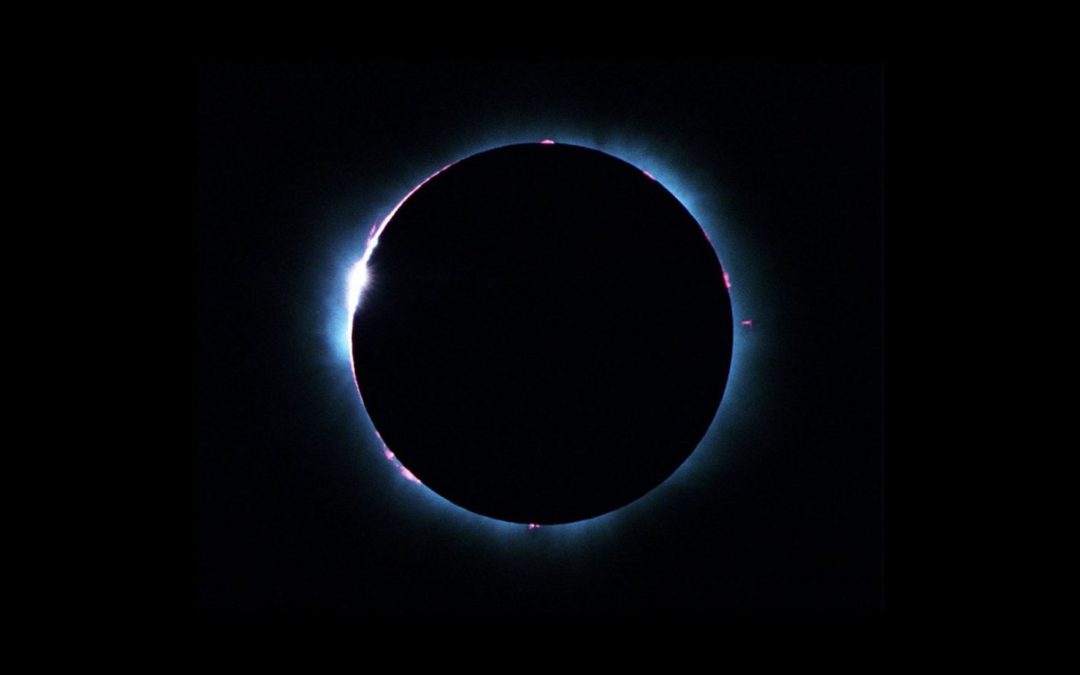
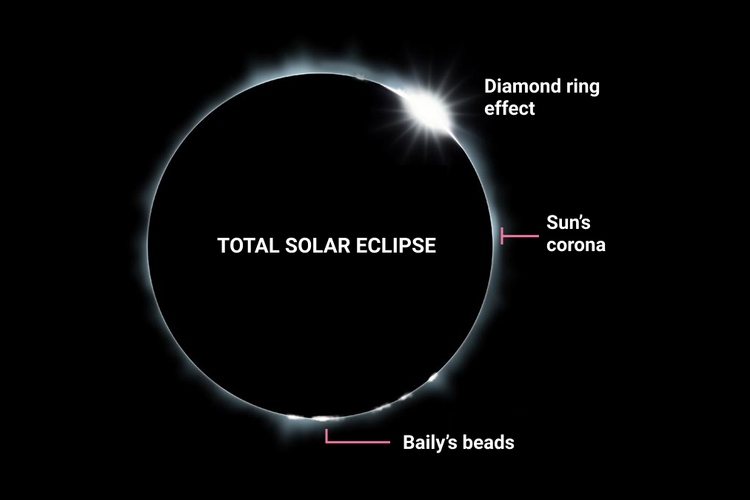
- Total eclipse begins (2nd contact): The entire disk of the Sun is covered by the Moon. Observers in the path of the Moon’s umbra may be able to see Baily’s beads and the diamond ring effect, just before totality.
- Totality and maximum eclipse: The Moon completely covers the disk of the Sun. Only the Sun’s corona is visible. This is the most dramatic stage of a total solar eclipse. At this time, the sky goes dark, temperatures can fall, and birds and animals often go quiet. The midpoint of time of totality is known as the maximum point of the eclipse. Observers in the path of the Moon’s umbra may be able to see Baily’s beads and the diamond ring effect, just after totality ends.
- Total eclipse ends (3rd contact): The Moon starts moving away, and the Sun reappears.
- Partial eclipse ends (4th contact): The Moon stops overlapping the Sun’s disk. The eclipse ends at this stage in this location.
Protect Your Eyes!
Never look directly at the Sun, eclipsed or otherwise, without proper protective eyewear. The Sun’s UV radiation can burn the retinas in your eyes, and cause permanent damage or even blindness.
To watch a solar eclipse safely, wear protective eclipse glasses or project an image of the eclipsed Sun using a pinhole projector.
Only Safe during Full Eclipse
It is safe to view a fully eclipsed Sun, totality, with the naked eye. It is also safe to observe totality through cameras, telescopes or binoculars without any special filters. However, naked eye observations MUST NOT begin until Baily’s beads have completely disappeared (see below). Also, naked eye observations MUST finish before Baily’s beads reappear at the end of totality. Make sure you know how long totality will last at your location.
Unique Sights around Totality
Certain phenomena can only be seen during a total solar eclipse:
-
- Shadow bands: About 1 minute before totality, moving wavy lines of alternating light and dark can be seen on the ground and along walls. These shadow bands are the result of Earth’s turbulent atmosphere refracting the last rays of sunlight.
- Diamond ring: Seen about 10 to 15 seconds before and after totality, the solar corona (the outer atmosphere of the sun) becomes visible; seen together with a single jewel of light from the sun, this creates a diamond ring effect.
- The Sun’s corona: As the diamond ring fades, the Sun’s corona becomes more prominent and is visible as a faint ring of rays surrounding the silhouetted Moon. The corona is the outermost layer of the Sun’s atmosphere, and it is around 200–300 times hotter than the Sun’s surface. The corona’s temperature can reach over 1 million °C (1.8 million °F).
- Baily’s beads: About 5 seconds before totality, Baily’s beads appear. They are little bead-like blobs of light at the edge of the Moon. They are created because gaps in the mountains and valleys on the Moon’s surface allow sunlight to pass through in some places but not others.
- The Sun’s chromosphere: A lower layer of the Sun’s atmosphere, the chromosphere, gives out a reddish glow which can only be seen for a few seconds after totality sets in.
The phenomena then repeat in reverse order:
- Baily’s beads: The beads grow and merge into a crescent as the Moon continues to move away.
- Diamond ring and corona: As the diamond ring grows brighter, the corona fades.
- Shadow bands: The moving wavy lines reappear on the ground shortly before the crescent Sun becomes visible again and nature recovers.
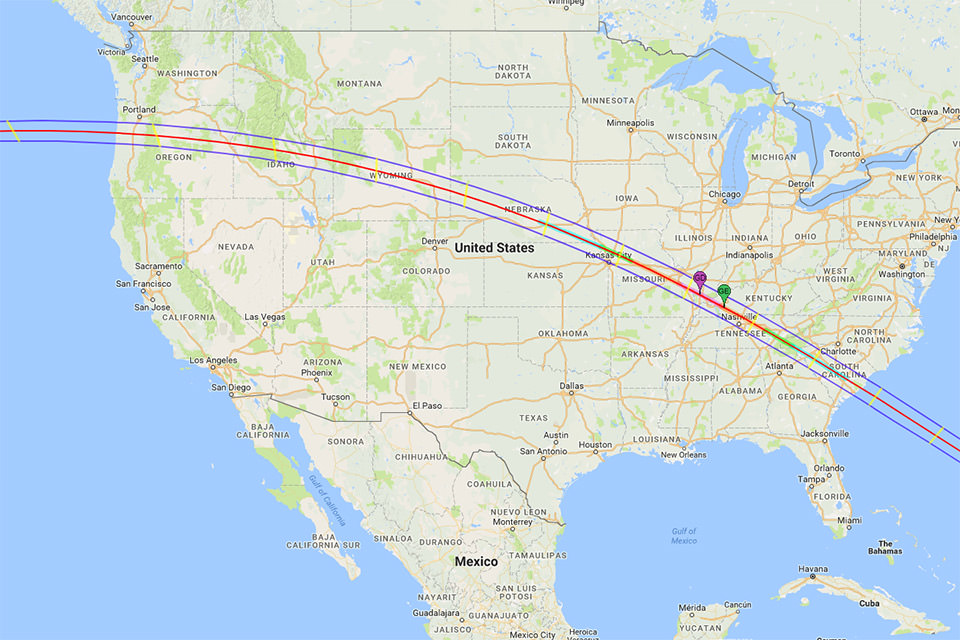
2017 Total Solar Eclipse
The 2017 solar eclipse will start on August 21 at 9:05 AM and will end at 4:09 PM, depending on where you will be located in the US. Totality will begin at 10:16 AM PT on the Oregon coast and end at 2:40 PM ET near Charleston, South Carolina. The longest total solar eclipse will be experienced in Carbondale, Illinois, with totality lasting two minutes and 40 seconds. Here is a sample table with eclipse times in different cities across 10 states, provided by NASA:
| Location | Eclipse Begins | Totality Begins | Totality Ends | Eclipse Ends | Timezone |
|---|---|---|---|---|---|
| Madras, OR | 09:06 AM | 10:19 AM | 10:21 AM | 11:41 AM | PT |
| Idago Falls, ID | 10:15 AM | 11:33 AM | 11:34 AM | 12:58 PM | MT |
| Casper, WY | 10:22 AM | 11:42 AM | 11:45 AM | 01:09 PM | MT |
| Lincoln, NE | 11:37 AM | 01:02 PM | 01:04 PM | 02:29 PM | CT |
| Jefferson City, MO | 11:46 AM | 01:13 PM | 01:15 PM | 02:41 PM | CT |
| Carbondale, IL | 11:52 AM | 01:20 PM | 01:22 PM | 02:47 PM | CT |
| Paducah, KY | 11:54 AM | 01:22 PM | 01:24 PM | 02:49 PM | CT |
| Nashville, TN | 11:58 AM | 01:27 PM | 01:29 PM | 02:54 PM | CT |
| Clayton, GA | 01:06 PM | 02:35 PM | 02:38 PM | 04:01 PM | ET |
| Columbia, SC | 01:13 PM | 02:41 PM | 02:44 PM | 04:06 PM | ET |
Here is how the moon shadow will pass through the US:
Let’s Get Into how to get it done!
Gear Considerations
When it comes to gear, you will need to consider two types of gear: one for viewing and one for photographing a solar eclipse. If you prefer to enjoy seeing the eclipse with your naked eyes, then get a pair of eclipse glasses. At just 5 bucks for a pack of 5 eclipse glasses, you can equip yourself and those around you with the right type of protection. And no, regular sunglasses will not work – you need much darker filters that barely pass any light through them. If you want to step up the viewing game, you will either need a solar telescope or solar binoculars. If you already own a telescope and it allows you to add filters, you will need to get a separate solar filter. Since there are too many solar telescopes, solar binoculars and add-in solar filters to list and this article is aimed at providing detailed information on how to photograph a solar eclipse, I will not provide any specific recommendations on such gear.
For photographing a solar eclipse, you will need to carefully choose what camera gear you will be taking with you. Ideally, you might want to capture two separate types of images using two different setups: a close-up of the eclipse using a super telephoto lens and a wide-angle view of the scene you will be at. Both can yield very interesting and unique images! Keep in mind that it is going to get fairly dark during totality, so a wide-angle view of the scene around you might result in great-looking photographs, especially if you have something beautiful to include as part of your composition. Based on this, I will be providing two different gear and technique recommendations – one for getting a close-up of the solar eclipse, and one for those wide-angle shots.
Let’s start with the basics. Here is a quick list of camera gear you will need to photograph a close-up of a solar eclipse:
- Digital Camera: Pretty much any digital camera will do, whether you are planning to shoot with a DSLR, a mirrorless camera or a point-and-shoot with an optical superzoom lens.
- Super Telephoto Lens: If you want to get a good close-up of the solar eclipse, you will need a super telephoto lens – the longer, the better. See additional notes below on ideal focal length.
- ND / Solar Filter: A dense solar ND filter is a requirement to prevent potential damage to your eyes or your camera gear.
- Tripod: You certainly do not want to be hand-holding a camera with a super telephoto lens attached to it, so a tripod is a must.
- Remove Shutter Release: Not necessary, but might be useful during totality when it gets darker and your shutter speed drops to camera-shake prone levels.
While your camera might not be very important, your choice of a lens and its focal length definitely is. Keep in mind that if you want to get a good close-up of a total solar eclipse, you will need to get as much focal length as possible, but within limits. Take a look at the below comparison of the relative size of the eclipse to full image width:

As you can see, a 200mm lens on a full-frame camera is going to yield a tiny view of the eclipse – you will need to crop quite a bit to get a usable image. And if you go too extreme and shoot with a 2000mm setup, you will be faced with all kinds of challenges: from constant needs to re-adjust framing, to cutting off the sun’s corona. Ideally, you would want something in between, perhaps around 800mm to 1200mm at most.
Now you might be wondering how it would be possible to achieve such crazy focal lengths – after-all, most people don’t have an 800mm f/5.6 lens to shoot with. The good news is, there are a number of great solutions and this is where crop factorcomes into play. That’s right, if you use a camera with a cropped sensor, you can get to those crazy focal lengths much easier at a much lower cost. For example, Nikon 1 cameras have a 2.7x crop factor, so if you use something like the Nikon 1 NIKKOR VR 70-300mm f/4.5-5.6, you could easily get to 810mm equivalent field of view by zooming in to 300mm. And if you don’t have that particular lens for Nikon 1, you could slap on a cheap 70-300mm VR lens with the Nikon FT1 adapter and get to the same focal length. If you own a Nikon 300mm f/4 lens, you could slap on a 1.4x teleconverter and easily get to 1134mm with a Nikon 1 camera, which is pretty incredible!
If all this sounds too expensive or if you don’t have a Nikon 1 setup, why not get something like the Nikon Coolpix P900? At $600, it is a cool little setup to get to 2000mm. Don’t believe me? Check out our in-depth review of the Nikon Coolpix P900.
Things get a bit tougher with APS-C cameras, since you will still need something like a Tamron 150-600mm to get to 900mm equivalent FoV. And if you are planning to use a full-frame camera, you’d better shoot with a high-resolution DSLR like the Nikon D810, since you will most likely be cropping quite a bit.
For these reasons, I think an ideal super telephoto setup would be a Nikon 1 camera with native or adapted lenses, or a superzoom point-and-shoot like the Nikon Coolpix P900. These will easily get you the reach you will need to magnify the solar eclipse as much as possible.
For the second camera to capture those wide-angle shots, you don’t need anything special – any camera + wide-angle lens combination will do. Just make sure you have another tripod or surface where you can rest this camera. To make sure that you don’t go back and forth between cameras during totality, I would set up this secondary camera to capture a timelapse, as recommended further down below. You do not want to be messing with your cameras at the time of totality, since it will only last a couple of minutes.
Safely Viewing a Solar Eclipse
If for some reason you do not have eclipse glasses or it is too late to get them, you could try out the below solutions for viewing the solar eclipse:
- Build a small pinhole camera / projector: Building a small pinhole camera/projector is very simple. Just grab two pieces of cards, make a small hole in one card, then hold the card with the hole above the other one and align them with the sun. The sun’s image will be projected through the hole into the second card. If you want something more advanced, check this tutorial out, where it is shown how to build a simple projector using a pair of binoculars and two pieces of paper to safely observe a solar eclipse.
- Use the camera’s liveview / LCD: If you are planning to take pictures, you can also safely look at the LCD when your camera is in liveview mode. However, in order to protect your camera from potential damage, you will first need to make sure to mount a very dense / strong neutral density filter (15+ stop solar eclipse ND filter like the Hitech ND 5.4 is ideal) in front of your lens. After that, make sure to turn off Auto ISO, set your camera ISO to the lowest number (something like ISO 100) and stop down your lens to something like f/8. This will ensure that very little light actually passes through your lens to potentially cause any damage to your camera sensor.
If you have a point-and-shoot camera with a relatively small front lens element, the same eclipse glasses you wear to protect your vision could be used to view the solar eclipse. Just hold it directly in front of the lens and it should do the trick.
Photographing the Sequence
One thing you will need to decide early on, is whether you are going to be photographing the entire sequence of the solar eclipse, or just the period of totality when the moon blocks the sun. I would personally recommend to document the whole sequence from the beginning to the end, so that you have pictures of all the phases – from partial eclipse to “diamond ring” to totality and back. The great thing about having the entire sequence in pictures, is that you can later combine images together, creating a nice-looking composite image.
Bear in mind, you will have to be very patient though, as the process could take a while. If for whatever reason you cannot stay for the entire duration of the eclipse, then I would just focus on times near, during and right after totality.
Camera Settings
Camera settings are quite simple. Here is what I would recommend to use at the start of the eclipse:
- Set your ISO to the lowest value like ISO 100.
- Set your camera mode to Manual.
- Set your shutter speed to its fastest value like 1/4000 or 1/8000. You will need to adjust it from there, depending on how dense your ND filter is and how dark it gets.
- Stop your lens aperture down to its “sweet spot”, which is generally between f/5.6 and f/8.
Depending on what solar ND filter you are using, your shutter speed should be fast enough to not cause any vibration issues during partial eclipse. However, once totality starts, you will experience drastic drops in shutter speed, to the point where it will be necessary to remove the solar ND filter. To reduce chances of camera shake, make sure to enable Electronic Front-Curtain Shutter, if you have it on your camera. Once it gets dark, you will need to be much more careful when handling your camera gear. Make sure to either use a remote shutter release cable or exposure delay mode in combination with a timer to reduce potential for camera shake.
Keep in mind that if you do decide to remove the solar ND filter during totality, you should still not use the optical viewfinder to look at the sun, since UV rays will be very harmful to your eyes. As soon as the totality ends, make sure to put the ND filter back right away!
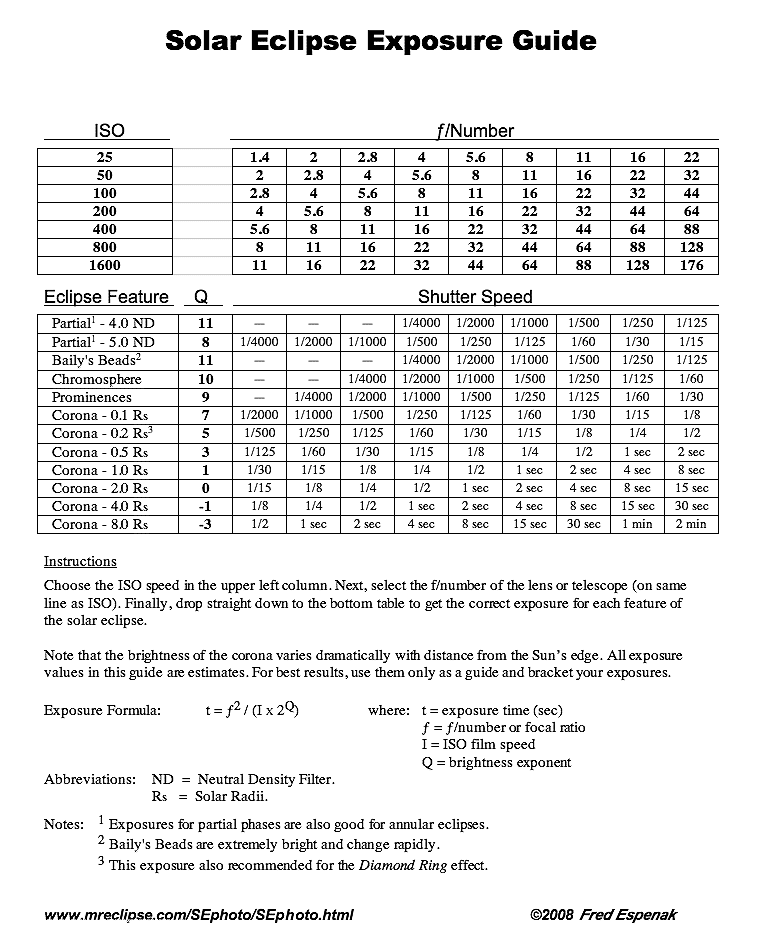
To give you a basic idea of the exposure times you might be dealing with during the solar eclipse, take a look at the below table, which is compiled from this source:
| Camera ISO | ISO 100 | |||||
| Aperture | f/2.8 | f/4 | f/5.6 | f/8 | f/11 | f/16 |
| Partial Eclipse (5.0 ND) | 1/4000 | 1/2000 | 1/1000 | 1/500 | 1/250 | 1/125 |
| Baily’s Beads (No ND) | 1/32000 | 1/16000 | 1/8000 | 1/4000 | 1/2000 | 1/1000 |
| Chromosphere (No ND) | 1/16000 | 1/8000 | 1/4000 | 1/2000 | 1/1000 | 1/500 |
| Prominences (No ND) | 1/8000 | 1/4000 | 1/2000 | 1/1000 | 1/500 | 1/250 |
| Corona (No ND, Inner to Outer) | 1/2000-1/2 sec | 1/1000-1 sec | 1/500-2 sec | 1/250-4 sec | 1/125-8 sec | 1/60-15 sec |
As you can see, your shutter speed will vary greatly depending on what phase of the solar eclipse you are capturing. When starting out with photographing a partial eclipse, even with a 5.0 Solar ND (16.5 Stops) filter attached, you might still be shooting at fairly fast shutter speeds. However, once total eclipse starts, you will need to remove the solar ND filter, or your shutter speed will be way too low. The last thing you want is deal with a long exposure – that will not only blur the moon and the sun, but also cut precious time.
Do pay attention to your exposure – you do not want heavily underexposed or overexposed images. If things get tricky, you might want to bracket your shots as well.
Focus Accuracy and Sharpness
No matter what lens you are using, getting accurate focus on the sun and the moon is extremely important. I know that some photographers suggest to shoot at infinity using lens marks, but since many lenses allow focusing “beyond infinity”, getting a true infinity focus is not that easy – a slight inaccuracy in focus will make the sun and moon appear blurry. Forget about trying to acquire focus on the sun without a solar ND filter – it is too bright and could be too small in the frame for that. What I would recommend instead, is to use the moon for focusing via liveview way before the solar eclipse starts. This way, you get your focus right with your setup once and you don’t have to touch it again until the end. Make sure to switch off autofocus once you get accurate focus, so that your camera does not attempt to refocus each time you take a picture. Once done, take a picture and make sure that it looks sharp by zooming in on it via the camera’s LCD.
Composition and Framing
When shooting with a super telephoto setup for close-up shots, don’t worry about composition – simply place the moon and the sun anywhere near the center of your frame. The exact location does not matter as much, since you can easily crop the image later on in post-processing. If you have some thick clouds in your frame, then play with the exposure a little and see if you can use clouds as part of your composition. Here is an image that I captured with the clouds, when clouds opened up a little bit during the start of the eclipse:

However, if you are planning to shoot with a wide-angle lens, then you will obviously need to carefully plan your shots and pay attention to both composition and framing. Having an interesting foreground subject is obviously important, so do take the time to scout a few locations early on. Ideally, estimate beforehand where the moon and the sun will be in your frame at the time of totality, so that you can place the two in an interesting location relative to your subject. Keep in mind that things will get pretty dark at the time of totality, so if you are planning to shoot a timelapse, you should ensure that your camera will adjust its exposure accordingly.
Enjoy the Moment
Don’t forget to enjoy the moment. While as a photographer you will most likely want to capture a solar eclipse, if all you do during the eclipse is mess with your camera and never even see the magic in the sky and all around you, then perhaps it is a good time to stop! Remember, this might be your only chance to see a total solar eclipse in your lifetime, so make it an unforgettable experience, not a picture-taking-only experience.
Are you planning to see or photograph the total solar eclipse next month? If yes, then please let us know where you are planning to be, with whom and what you are planning to take with you gear-wise in the comments section below!


